The Layout page allows you to do the following:
Position the fixtures in each fixture group on the stage (either linearly or in a 2D grid)
View the pixel and mover counts in each fixture group
Enable/disable fixture groups
Enable/disable and Solo individual fixtures
Edit/delete fixtures from the stage (any changes are updated in the Patcher and Controls page)
Fixture Groups
Fixture Groups give you the ability to set different lighting effects, and mappings to different sets of fixtures. Harnessing the power of Fixture Groups correctly can really step up your light show.
Use Cases For Fixture Groups
Here are some ideas on how to use Fixture Groups:
Setup a static ‘wash’ Cue that is only applied to a specific set of fixtures on your stage. Then trigger that Cue during your show on demand.
Apply different color palettes to different sets of fixtures to create ‘blocky’ type effects
Use ‘Allow Blackout’ to have groups of fixtures turn off in sync with the music to create more dynamic effects
MaestroDMX provides plenty of flexibility with 4 Fixture Groups.
Renaming Fixture Groups
You can rename your fixture groups by clicking the 3-dot menu on the right side of the Fixture Group selector drop-down on the ‘Layout’ tab on the ‘Stage’ page. Select ‘Edit Fixture Group’ to rename the group.
Pixel and Mover Mapping
Each Fixture Group provides the ability to map the fixtures within the group to the real world. Doing this well will greatly enhance your light show since MaestroDMX’s Lighting Patterns use 1D and 2D mapped effects. Click the arrow toward the upper right side to open the Mapping controls.

The Mover Mapping will determine the layout of your pan/tilt movement, while the Pixel Mapping will determine the layout of your RGB, Color Wheel-based pixels.
IMPORTANT: Once you have mapped your stage (see below) you can use the Mapping Test Pattern, accessible on the Show page to check if the mapping is correct.
Mapping in 1D
By default, fixtures are placed in a 1-dimensional line, left to right or right to left. You can change the position by dragging each fixture in the Layout tab.
Mapping in 2D
MaestroDMX provides a limited way to map fixtures onto 2D grids. To access the mapping controls, expand the opposing arrow on the far right side of the layout page.
NOTE: 2D grid mapping assumes that you have fixtures in a grid with the same number of fixtures (pixels or movers) for each column and row. More precise 2D-pixel mapping support is part of our roadmap and will be supported in a future software release.
If you are running moving head lights in a 2D grid then you will need to set up a 2D mapping for both the pixels and movers independently to take advantage of the 2D geometry.
There are 4 types of 2D Grid mapping:
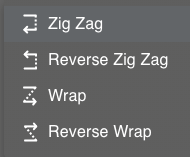
Zig Zag
Zig Zag will take the linear order specified in your Layout and ‘snake’ it back and forth to create the grid, starting from the top left and moving down.
Reverse Zig Zag
Reverse Zig Zag will take the linear order specified in your Layout and ‘snake’ it back and forth to create the grid, starting from the bottom left and moving up.
Wrap
Wrap will take the linear order specified in your Layout and add it to the grid sequentially by starting at the beginning of each row, starting from the top left and moving down.
Reverse Wrap
Reverse Wrap will take the linear order specified in your Layout and add it to the grid sequentially by starting at the beginning of each row, starting from the bottom left and moving up.
Segment Length
The ‘Length’ refers to the number of columns in your grid. Another way to understand this would be to figure out how many fixtures you have in a row along the horizontal from left to right. MaestroDMX will then automatically calculate how many rows you need and create a 2D Grid mapping.
Was this article helpful?
That’s Great!
Thank you for your feedback
Sorry! We couldn't be helpful
Thank you for your feedback
Feedback sent
We appreciate your effort and will try to fix the article